The Robo3DScan Project

Recently, the integration of vision with robots has gained considerable attention from industry. Pick and place, sorting, assembling, cutting and welding processes are examples of applications which can have great advantage from the combination of information from 3D images with robot motion.

Our laboratory developed, in collaboration with DENSO EUROPE B. V., a system integrating 3D vision into robotic cells. The project led to the Roboscan system.

Roboscan is a Robot cell that combines 2D and 3D vision in a simple device, to aid a Robot manipulator in pick-and-place operations in a fast and accurate way. The optical head of Roboscan combines the two vision systems: the camera is used “stand-alone” in the 2D system, and combined to a laser slit projector in the 3D system, which operates in the triangulation mode. The 2D system, using suitable libraries, provides the preliminary 2D information to the 3D system to perform in a very fast, flexible and robust way the point cloud segmentation and fitting. The most innovative part of the system is represented by the use of robust 2D geometric template matching as a means to classify 3D objects. In this way, we avoid time-consuming 3D point cloud segmentation and 3D object classification, using 3D data only for estimating pose and orientation of the robot gripper. In addition, a novel approach to the template definition in the 2D geometric template matching is proposed, where the influence of surface reflectance and colour of the objects over the definition of the template geometry is minimized.

Related Publications

Bellandi, P.; Docchio, F.; Sansoni, G. “Roboscan: a combined 2D and 3D vision system for improved speed and flexibility in pick-and-place operation“, The International Journal of Advanced Manufacturing Technology, Vol. 69, no. 5–8, pp. 1873–1886. 2013

3D Acquisition and modeling for crime scene documentation

This project is aimed at testing the performance of 3D optical acquisition and reverse engineering to carry out the contact-less gauging of crime scenes for their documentation and analysis. In particular, the study focuses on two aspects. The former is the “in-field” measurement and modeling of crime scenes.

The activity carried out by the Laboratory staff deals with a number of significant cases. A comprehensive summary of the experiences is in the references below.

Related Publications

Cavagnini, G.; Scalvenzi, M.; Trebeschi, M.; Sansoni, G. “Reverse engineering from 3D optical acquisition: application to Crime Scene Investigation“, Proceedings of Virtual Modelling and Rapid Manufacturing, Advanced Research in Virtual and Rapid Prototyping, pp. 195-201. 2007

Sansoni, G.; Docchio, F.; Trebeschi, M.; Scalvenzi, M.; Cavagnini, G.; Cattaneo, C. “Application of three-dimensional optical acquisition to the documentation and the analysis of crime scenes and legal medicine inspection“, 2007 2nd International Workshop on Advances in Sensors and Interface, pp. 1-10. 2007

Sansoni, G.; Cattaneo, C.; Trebeschi, M.; Gibelli, D.; Porta, D.; Picozzi, M. “Feasibility of contactless 3D optical measurement for the analysis of bone and soft tissue lesions: new technologies and perspectives in forensic sciences“, Journal of Forensic Sciences, Vol. 54, no. 3, pp. 540-545. 2009

Sansoni, G.; Cattaneo, C.; Trebeschi, M.; Gibelli, D.; Poppa, P.; Porta, D.; Maldarella, M.; Picozzi, M. “Scene-of-Crime Analysis by a 3-Dimensional Optical Digitizer: A Useful Perspective for Forensic Science“, The American Journal of Forensic Medicine and Pathology, Vol. 32 no. 3, pp. 280-286. 2011

The Brotlaibidole project

The project is aimed at studying a very specific typology of archaeological finds, called the ‘Tavolette enigmatiche‘ or ‘Brotlaibidole‘. The activity developed at the Laboratory focused on (i) the optical 3D acquisition of the pieces, (ii) the creation of 3D meshes, and (iii) the study of the occurrences and of the morphological signs impressed on them.

This work is part of a larger activity that involves a number of partners. These are the Regione Lombardia (A.M. Ravagnan), the Provincia di Mantova (T. Grizzi), the Comune di Cavriana (B. Righetti), the Museo Archeologico dell’Alto Mantovano (A. Piccoli), the Università di Verona (S. Marchesini).

The “Brotlaibidole” are small baked-clay objects of prevalently ovoid shape of the 2100-1400 B.C. periods, engraved with symbols and drilled holes whose meaning is still unknown.

Their presence in Italy and in many countries in the northeast Europe represents an “enigma” for the specialists. The reason is that the shape and the orientation of the signs is very similar among the objects, even if they have been found in different geographical sites.

Hence, we have been required to accomplish an extensive measurement campaign in Europe, and to produce and collect the 3D models in a unique database, in view of their future study by the specialists. To carry out the measurement, we used the Vivid 910 sensor (Konica Minolta Inc.). Besides the measurement performances, that well suit to the resolutions required in this application, the system is rugged, portable, and fast in the setup and the acquisition processes. So far, 30 specimens have been acquired, modeled and organized in a database. Their resolution is 120μm.

Following the acquisition and point-cloud elaboration, we carried out a selection of symbols to be compared. The different symbols were extracted from the models and properly oriented in a suitable reference frame.

Symbols from different “pieces” were then superimposed and aligned, in a totally automatic way.

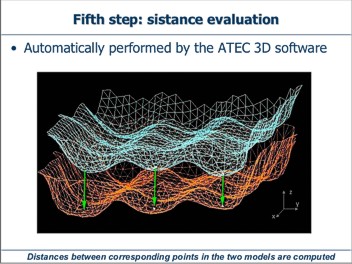
Color coding was used as a user-friendly way to obtain information about the amount of overlapping between the two symbols. All these steps were performed by the self developed “ATEC-3D” software: a user-friendly environment, specifically intended to be used by a non software expert such as an archaeologist.

In the ATEC-3D panel, the signs to be compared are chosen, and they appear as 3D models. Point clouds and their superposition in color coding are presented after suitable automatic registration and distance compensation. An index of similarity (rms value of the differences) is obtained to quantitatively assess the goodness of overlapping.

This process has been tested on a suitable number of self-made signs used as references, printed onto clay surfaces under different angles and with different pressures.

The ATEC-3D software has been delivered to the archaeologists, who have now started the overall comparison of all signs derived from the 30 models, whose 3D acquisition has been made and whose signs are now in the common database.

ChamaleonEyes

This project deals with the design, the development and the characterization of a vision system based on passive stereo vision, using the Halcon 9.0 (MVTech) suite of functions for 3D vision. The measurement procedures have been developed in the VISUAL BASIC.NET platform. Special care has been dedicated to devop a flexible software tool, denominated CHAMALEONEYES, which allows the user to automatically unload the cameras, and to calibrate them in a fast and easy way.

Special panels are available to check the hardware status, to load new camera models, and to test them. The tool outputs the point cloud corresponding to the field of view acquired by the cameras.

Real time acquisition of silhouettes

The aim of this project is to design, implement and charaterise a vision system for the 3D reconstruction of objects rotating with respect to their axis by means of the Silhouette method. The system has been developed using LabView Real-Time 8.6.1 (National Instruments, NI).

 The hardware of the system is composed by the NI Embedded Vision System (EVS), the  Basler Scout scA1390-17gm/gc Gigabit Ethernet camera, and a telecentric lighting system combined with a telecentric optics (Optoengineering, Italy). The software tools dedicated to image acquisition and elaboration have been developed by using the NI-IMAQ vision libraies. The vision system is called  ‘OPTOSILHO‘.

A vision system for a labelling machine

In this work, a vision system specifically designed to monitor the labels on bottling lines for wine production industries is presented. The system is based on smart cameras, Real Time LabView sofware and IMAQ vision libraries. The work has been developed in the frame of a thesis work, in collaboration with Studio Progetti Automation srl (Italy). 

Bottling lines for wine are complex systems, which provide bottle rinsing, filling, capping, labelling, wrapping and pallettising. In this work, a vision system has been studied and implemented for the automatic control of the labelling machine. The bottling line, that is installed at Cantine Leonardo da Vinci (Tuscan, Italy), is characterized by a high level of automation, and is able to output 10.000 bottles per hour. However, the labeling machine is completely operator-dependant: three blocks of labels must be manually positioned on the machine for each wine brand. These are the front label, the back label and the DOCG label. The position of the labels with respect to the bottles is visually controlled and adjusted by the operators.

Due to human errors, it is possible that the operator mount on the machine labels corresponding to a wine brand different with respect to the one programmed on the bottling line. Early detection of this situation is mandatory to reduce downtime and, in the worse case, to avoid that the whole bottling process is performed from scratch.

3D image acquisition of crime scenes for documentation, analysis and medical inspection

In this thesis project the two students involved (Marco Scalvenzi and Gianluca Cavagnini) had the opportunity of using the Vivid 910 laser scanner to document 3D crime scenes at different resolution levels.

It was really interesting to capture medium range details, such as the injury tools and body parts, as well as short range details, like bullet holes, skin lesions, and blood patterns.

A numer of experiences have been performed both in indoor and in outdoor environments. The flexibility, the portability and the ease of use of this system revealed very precious to complete the projects.

present_photogrammetry.jpg

Photogrammetry: experiences carried out in the Laboratory from 2004 to 2007

From 2004 to 2007 a number of students have done projects and hands-on practice in the Laboratory with photogrammetry. The main goal was to understand pros and cons with respect to active vision: as such, 2D and 3D vision has been studied and used to perform measurments and to reconstruct real world scenes using industrial hardware.

A brief presentation of the activities carried out in the Laboratory during these years can be downloaded below.

Single Grating Phase-Shift (SGPS): a novel approach to phase demodulation of fringes

This project was developed in the context of the National Italian Project: Low-cost 3D imaging and modeling automatic system (LIMA3D). The Laboratory aim was to design, develop and perform a metrological characterization of a low-cost optical digitizer based on the projection of a single grating of non-coherent light.

SGPS (Single Grating Phase-Shift) is a whole field profilometer based on the projection of a single pattern of Ronchi fringes: a simple slide projector can be used instead of sophysticated, very expensive devices, to match the low-cost requirement.

A novel approach to the phase demodulation of the fringes has been developed to obtain phase values monotonically increasing along the direction perpendicular to the fringe orientation. As a result, the optical head can be calibrated in an absolute way, very dense point clouds expressed in an absolute reference system are obtained, the system set-up is very easy, the device is portable and reconfigurable to the measurement problem, and multi-view acquisition is easily performed.

DFGM_R_1.jpg

DFGM: combining steady fringe patterns to obtain high definition point clouds

The objective of this research project was the reduction of the mesurement time, and the possibility of using a simple slide projector instead of those based on LCD or DLP matrices.

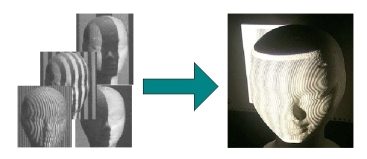
Fig. 1 shows the concept: the projecion of a number of fringe patterns, typical of the GCM, GCPS and PSM techniques is replaced by the projection of a single pattern, as for the SGM approach.

Fig. 1 - Example of a number of fringe pattern project onto surfaces and the novel single pattern projection proposed.

As depicted in Fig. 2, the optical head is simplified, and, in principle, it is possible to design the instrument in such a way that a very compact, low cost optical head is obtained.

The slide projector typically projects steady patterns as the one shown in Fig. 3.

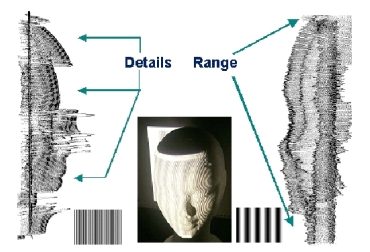
The elaboration follows the DFGM approach and results into two phase maps whose sensitivity to height variations is proportional to the period of the two components. The pattern at higher spatial period is used to save the range of the measurement, and the pattern at the lower period is used to increase the resolution (Fig. 4).

Fig. 4 - Scheme of the combination of the two patterns with high and low period.

The information from the two phase maps is used by the tringulation formula to compute the height of the object (the relative approach is used). The triangulation is performed on a relative basis, i.e., the geometrical parameters of the optical head must be accurately determined and given as input to the system. The shape map is relative with respect to a reference surface (a plane).

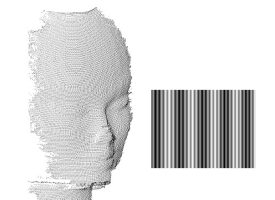
Fig. 5 shows an example of the quality of the obtained point clouds. Typical values of the measurement errors are in the range of 0.2 mm – 0.3 mm over an illumination area of 300mm x 230mm, and a measurement interval up to 100mm.

Fig. 5 - Point Cloud example obtained by the system.