The Winged Victory of Brescia

The natural commitment of the Laboratory to applied research and to cooperation with institutions led to the establishment of an agreement between the Comune of Brescia and the University of Brescia for the study and the 3D digitization of one of the symbols of the City, the statue named ‘Vittoria Alata’. This 2m-high, bronze statue is located at the Museo of Santa Giulia at Brescia.
The original motivation of the archaeologists was to measure with high accuracy the distances between pairs of fiduciary points, in order to determine the archetype of the statue, and to solve the problem of its collocation in the right temporal and spatial framework. 

To obtain the statue proportions, the statue was completely acquired using OPL-3D; Multiview registration, meshing and modeling of the mesh resulted in the virtual copy of the statue. By means of rapid prototyping, different copyes varying in the reproduction scale have been developed.

The copy of the Winged Victory developed by the Laboratory staff represented the city of Brescia at the exhibition of the ANCI Conference, Brescia, 8-9 november 2007.
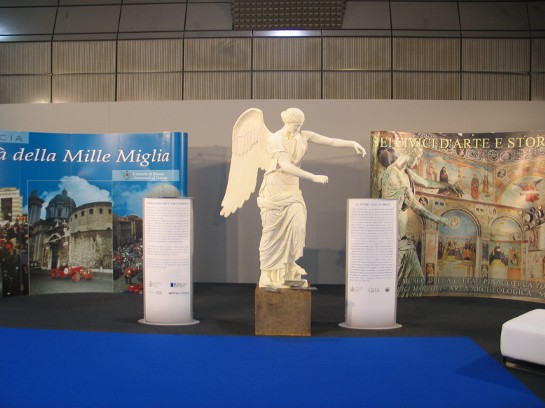
ANCI 002.jpg

Relevant Publications

Sansoni, G.; Patrioli, A.; Docchio, F.; Morandini, F. “Rilievo tridimensionale della Vittoria mediante tecniche di misura non a contatto“, Nuove ricerche sul Capitolium di Brescia: scavi, studi e restauri, pp. 159-163. 2002

Sansoni, G.; Docchio, F.; Patrioli, A. “Il rilievo 3D di forme complesse: stato dell’arte, applicazioni e prospettive“, Atti del 7° Convegno Nazionale di Strumentazione e metodi di misura elettroottici, pp. 263-270. 2002 

Sansoni, G.; Docchio, F. “A special case of 3-D optical measurements and reverse engineering for automotive applications: the Ferrari 250 Mille Miglia“, Proceedings of the 21st IEEE Instrumentation and Measurement Technology Conference, Vol. 2, pp. 1354-1359. 2004

Sansoni, G.; Docchio, F. “3-D optical measurements in the field of cultural heritage: the case of the Vittoria Alata of Brescia“, IEEE Transactions on Instrumentation and Measurement, Vol. 54, no. 1, pp. 359-368. 2005

The Brotlaibidole project

The project is aimed at studying a very specific typology of archaeological finds, called the ‘Tavolette enigmatiche‘ or ‘Brotlaibidole‘. The activity developed at the Laboratory focused on (i) the optical 3D acquisition of the pieces, (ii) the creation of 3D meshes, and (iii) the study of the occurrences and of the morphological signs impressed on them.

This work is part of a larger activity that involves a number of partners. These are the Regione Lombardia (A.M. Ravagnan), the Provincia di Mantova (T. Grizzi), the Comune di Cavriana (B. Righetti), the Museo Archeologico dell’Alto Mantovano (A. Piccoli), the Università di Verona (S. Marchesini).

The “Brotlaibidole” are small baked-clay objects of prevalently ovoid shape of the 2100-1400 B.C. periods, engraved with symbols and drilled holes whose meaning is still unknown.

Their presence in Italy and in many countries in the northeast Europe represents an “enigma” for the specialists. The reason is that the shape and the orientation of the signs is very similar among the objects, even if they have been found in different geographical sites.

Hence, we have been required to accomplish an extensive measurement campaign in Europe, and to produce and collect the 3D models in a unique database, in view of their future study by the specialists. To carry out the measurement, we used the Vivid 910 sensor (Konica Minolta Inc.). Besides the measurement performances, that well suit to the resolutions required in this application, the system is rugged, portable, and fast in the setup and the acquisition processes. So far, 30 specimens have been acquired, modeled and organized in a database. Their resolution is 120μm.

Following the acquisition and point-cloud elaboration, we carried out a selection of symbols to be compared. The different symbols were extracted from the models and properly oriented in a suitable reference frame.

Symbols from different “pieces” were then superimposed and aligned, in a totally automatic way.

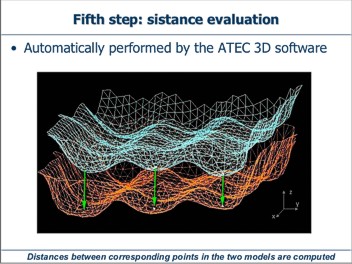
Color coding was used as a user-friendly way to obtain information about the amount of overlapping between the two symbols. All these steps were performed by the self developed “ATEC-3D” software: a user-friendly environment, specifically intended to be used by a non software expert such as an archaeologist.

In the ATEC-3D panel, the signs to be compared are chosen, and they appear as 3D models. Point clouds and their superposition in color coding are presented after suitable automatic registration and distance compensation. An index of similarity (rms value of the differences) is obtained to quantitatively assess the goodness of overlapping.

This process has been tested on a suitable number of self-made signs used as references, printed onto clay surfaces under different angles and with different pressures.

The ATEC-3D software has been delivered to the archaeologists, who have now started the overall comparison of all signs derived from the 30 models, whose 3D acquisition has been made and whose signs are now in the common database.

auto_orig_e_frange.jpg

Student Projects 2006-2007

This is an example of the typical project in the course of Optical Measurements

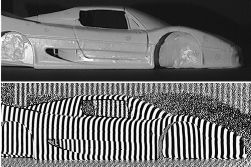
The students have been involved into the acquisition of a small car by using the system based on the projection of structured light. The PolyWorks suite of programs was used to acquire the mesh.

The real difficulty in this project was the calibration of OPL-3D, since it requires the knowledge of calibration camera models and the experimental practice with calibration masters  and setup of the projector-camera pair.

The students are Marco Tomasini and Michele Mancini. Download the presentation to have an insight of the work.

The small car to be acquired and renderize by using OPL-3D.

This project has been carried out at the city museum (Museo di Santa Giulia), where the students had to acquire the Winged Victory of Brescia statue using the Vivid 910 Scanner as the measurement sensor.

The statue was already measured in 2001 by using OPL-3D. The aim was to compare the measurement performances when coherent light (Vivid 910) is used instead of incoherent light (OPL-3D). 

The students who carried out the project are Nicola Modonesi and Davide Barba. Here you can download a brief presentation of their work.

The beautiful Winged Victory of Brescia statue to be acquired by the students.

In this project the students had to acquire a bas-relief at the Museo di Santa Giulia of Brescia by using the Vivid 910 Scanner.

The bas-relief is a very large one, representing the patron saints of Brescia, St. Faustino and Giovita. The aim was to produce the triangle mesh of the bass-relief.

The students who carried out the project are Mauro Facchini and Emanuele Tonoli. Here you can download a brief presentation of their work.

The bas-relief of Saints Faustino and Giovita to be acquired by the students.

To learn more on the Winged Victory of Brescia

The following sub-sections give an idea of the steps performed to carry out the project, and briefly present the results.

STEP 1: THE ACQUISITION OF THE POINT CLOUDS

Fig. 1 shows the point clouds acquired in correspondence with the head of the statue. Following the requirement of the archaeologist staff, the digitizer has been configured to acquire at the highest resolution, even at the expense of a considerable number of views and of an increased complexity of the alignment process. In the figure, 41 views are shown after the alignment (performed in means of the PolyWorks IM_Align module). Each one is characterized by a lateral resolution of 0.2 mm, and a height resolution from 0.1 mm to 0.3 mm, depending on the quality of the measurement. The measurement error spans from 0.050 mm to 0.2 mm: this variability mainly depends on the colour of the surface and on the presence of numerous undercuts, holes, and shadow regions.

The body of the statue has been acquired at lower resolutions, depending on the different body segments. Special care has been taken to avoid misalignment between the views, especially considering that the registration process was very complex, due to the high number of point clouds (more than 500) needed to fully digitize the statue. The measurement was performed in two steps: in the former, the skeleton was acquired (few, large views at low resolution, along suitable paths around the statue), to minimize the alignment error. In the latter, a high number of small views was captured and aligned to the skeleton. At the end of the process, the skeleton was eliminated.
Fig. 1 - Point cloud obtained of the head of the statue, very dense of details.

STEP 2: THE CREATION OF THE TRIANGLE MODELS

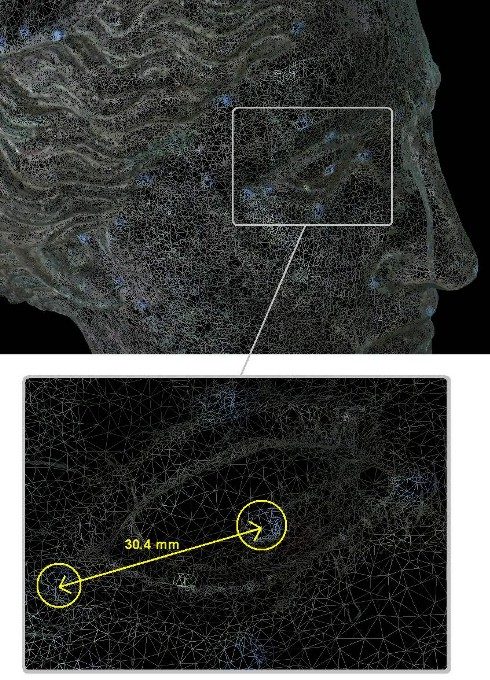
The IM_Merge module of Polyworks has been used to generate the polygon model from the measured data. Preliminarily, proper filteringdecimation and fusion of the partial views were carried out. Models characterized by different levels of adherence to the original point cloud have been created. Fig. 2 shows that one at the highest accuracy that has been used by the archaeologists to perform the measurements between the pairs of fiduciary points.

The measurement is very easy: the operator only selects on the display the two triangles representative of the fiduciary points and the software automatically evaluates and displays the corresponding distance. The measurement is very precise, due to (i) the high quality of the original data, (ii) the availability of the colour information acquired with the range data, and (iii) the density of the triangles within each single marker, as highlighted in the zoom of the figure. 
vittoria_wire.jpg
Fig. 2 - High accuracy section of the head with a zoom of the eye. The measurment is very precise!

STEP 3: THE EDITING OF THE TRIANGLE MODELS

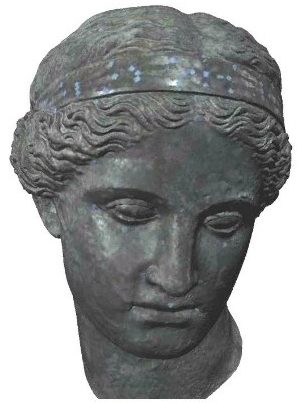
The Polyworks IM_Edit module was very useful for the editing of the triangle models. The objective was to eliminate holes, and in general all the topological irregularities deriving from the invalid measured data. As an example, Fig. 3 shows the appearance of the high-resolution triangle model of the head before the editing operation, while Fig. 4 shows the edited mesh obtained: it is easy to note how all the holes disappeared, resulting in a very appealing rendering of the surface. This model, when the colour information is added, as in Fig. 5, is suited also for applications different with respect to the original, metrological one. These are, for example, the virtual musealization of the statue, and the creation of a topologically closed STL model, that allows us the creation of the copy of the statue.
vittoria_modello_testa.jpg
Fig. 5 - The head of the Winged Victory with the colour information added on top of the mesh.

STEP 4: THE CREATION OF SCALED REPRODUCTIONS OF THE STATUE

This step has resulted in the achievement of a number of copies of the Winged Victory. In Fig. 6 the 1:8 scaled copy of the head of the statue is shown. The work has been accomplished in the framework of the collaboration between our Laboratory and the Laboratory of Fast Prototyping of the University of Udine. A rapid prototyping machine has been used to produce the model, by means of the stereo lithography technique. The CIBATOOL SL 5190 has been used as the material. The overall dimension of the prototype is 140 x 110 x 133 mm. The memory occupation of the original STL file was 10MB: it has been sent via internet to the Laboratory located in Udine. The time required to obtain the copy was 0.20 hours for the elaboration of the data, plus 15 hours for the prototypization.

Fig. 6 - The prototyped models of the Winged Victory head, before and after the colour application on top.

A suite of copies of the whole statue has been obtained in the framework of the collaboration between the Direzione Civici Musei di Arte e Storia of Brescia and the EOS Electro Optical Systems GmbH, located in Munich, Germany. The work led to the development of two 1:1 scaled copies of the statue have been produced. For them, the Laboratory has provided the high resolution STL file shown in Fig. 7 (16 millions of triangles).

The model was segmented into sub-parts, that were separately prototyped. Fig. 8 shows the copy of the statue that is currently placed in the hall of EOS gmbh, Robert-Stirling-Ring 1, 82152 Krailling Munchen DE.

Further experimentation dealing with the generation of the mathematics of the surfaces has been carried out. Obviously, we did not want to “redesign” the shape of the statue: instead, the objective was to verify the feasibility of the generation of the CAD model of the surfaces, in view of its use mainly in two applications. The former is the reconstruction of lost parts (for example, the fingers of the hands), the latter is the virtual modification of the relative position of sub-parts of the body. For example, this is the case of the position of the head of the statue, which seems excessively inclined with respect to the bust.

Step 5: the creation of the CAD models

The feasibility study has been performed on the head. The Raindrop Geomagic Studio 3.1 has been used. The triangle models of these two body segments have been imported as STL files from the PolyWorks suite. The Geomagic environment elaborated them and generated the CAD model in three steps. The first one allowed the determination of the patch layout (in a fully automatic way); the second one automatically identified a proper number of control points within each patch, the third one fitted the NURBS surfaces to the control points. The following figures show the process in the case of the head of the statue. It is worth noting the regularity of the surfaces at the borders of each patch (Fig. 9), the complexity of the CAD model (Fig. 10) and the adherence of the mathematics to the triangle model (Fig. 11).

Fig. 11 - The adherence of the rendered model on the point cloud measured one is really good, as highlighted in the figure.